


An original Nosey Nest Pattern.
© Copyright 2008 Nosey Nest. All rights reserved.
Please do not make money using this pattern. Just store it in the piggy bank...

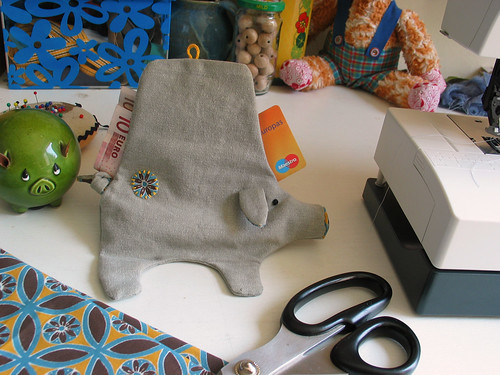
It's obvious pigs are very nosey animals. So a free piggy bank pattern is the logical thing to do..... isn't it ?
Parts ( download PDF part 1 and part 2. )
1. Exterior side A ( cut once, exterior fabric )
2. Exterior side B ( cut once, exterior fabric )
3. Lining side A ( cut once, lining fabric )
4. Lining side B ( cut once, lining fabric )
5. Nose ( cut once, lining fabric )
6. Ears ( cut four times ; twice lining fabric, twice exterior fabric )
7. Tail ( cut twice; once lining fabric, once exterior fabric )
Enlarge to every size you wish. This one can hold a creditcard and some money.
Materials needed
- Fabric ( print for lining, plain for exterior. Of course, you could do all solid or all print, or a variety. )
- Button
- Little black beads for the eyes.
- Embroidery floss to make a little loop to hook around the button.
- Optional some stuffing for the snout.
Description
- Cut all parts out of the fabric. Include a 1/4" seem.
- Sew together the ears and tail and turn right sides out ( Be patient, the fun starts after this ).
- Pin en sew parts 2 and 4 together up to the arrows ( see picture below ). Back stitch at each end to secure.
- Same for part 1 and 3.
- Pin both piggy sides together with the lining facing ( see picture below ).
- Put the tail in the right place. 
- Sew together from forehead to tail. Leave the nose open. Back stitch at each end to secure. Make sure the lining doesn't get stuck.
- Handsew the little circle for the snout in the right place.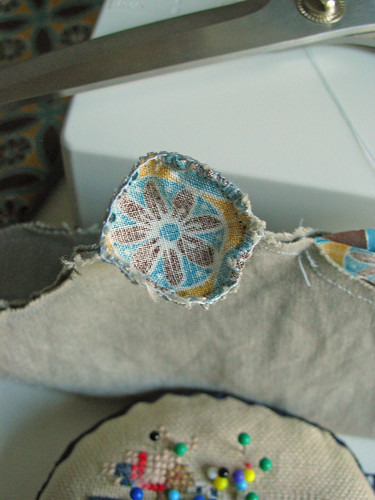
- Turn everything right side out.
- Sew the ears on ( don't sew through the lining ).
- Sew on some beads for the eyes ( mind the lining again ).
- Make a knot in the tail.
- Make a little loop for the button with embroidery floss.
- Sew on the button.
- You might want to put some stuffing in his nose.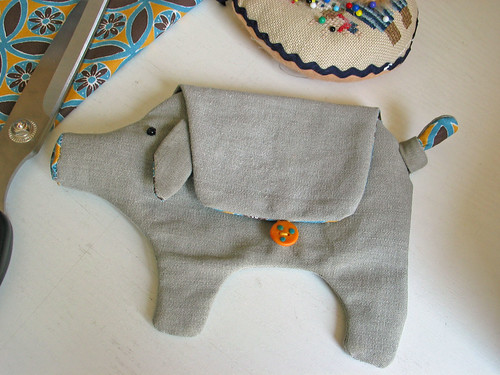
Pin and sew together the bottom of the lining.
Put the lining in his belly.
This piggy is ready to be fed ! You're done !
For anybody who wants to own a piggy bank but doesn't want to sew; the piggy bank you can see in the pictures above is now in the Nosey Nest Shop. More piglets will be added later.
If you made a piggy bank with this pattern please add a picture to the Nosey Nest Tutorial Group at Flickr.
Have fun !
May 14, 2008
Piggy Bank Freebie
Subscribe to:
Post Comments (Atom)


287 comments:
«Oldest ‹Older 201 – 287 of 287Are you looking for the best
Packers and Movers in Lahore
Thankyou for sharing such as nice article it is really informative blog. Keep it sharing.
Packers and Movers in Lahore
Good Article. I hope i will read these type of article in future again, being a writer i have to read multiple aritcles on daily basis as i have to work. Packers and Movers in Islamabad
Good Article. I hope i will read these type of article in future again, being a writer i have to read multiple aritcles on daily basis as i have to work. Packers and Movers Islamabad
Great Work, Keep Sharing.
Packers and Movers in Karachi
Thank you for being open to sharing information with us...Packers and Movers in Islamabad
Mahir Packers and Movers is a top-tier Packers and Movers in Karachi offering a comprehensive range of House shifting services in Islamabad and international cargo services.
Contact us:
03304860000
https://mahirpackers.com/
info@mahirpackers.com
Mahir International cargo Services in Islamabad stands out as a premier provider of air and sea freight logistics services, catering to businesses of all sizes.
contact us :03304860000
https://mahirpackers.com
Email:info@mahirpackers.com
House Shifting Services in Islamabad and international cargo services. In an era where convenience and efficiency are paramount, Mahir Packers and Movers in Lahore stands out by using cutting-edge technology and streamlined processes to ensure a hassle-free moving experience.
Mahir International cargo Services in Islamabad. In an era where convenience and efficiency are paramount, Mahir Packers and Movers in Lahore stands out by using cutting-edge technology and streamlined processes to ensure a hassle-free moving experience.
Thank you for being open to sharing information with us ..Packers and Movers in Karachi
Experience a seamless digital payment revolution with UPI Pay India powered by Bajaj Finserv. The app simplifies transactions by allowing users to transfer funds instantly across bank accounts using just a UPI ID. With UPI Pay India enabled within the Bajaj Finserv app, users can enjoy a secure, unified platform for paying bills, shopping online, and transferring money without hassles. The app also supports QR code scanning for merchant payments and offers a user-friendly interface for managing multiple bank accounts. Bajaj Finserv ensures that your UPI Pay India experience is secure, fast, and available round the clock.
Mahir Packers and Movers is the best Packers and Movers in Karachi
Packers and Movers in Karachi
Thank you for being open to sharing information with us Packers and Movers in Islamabad
Good Article. movers and packers in Islamabad
https://yellowpagespk.com/
Professional House Shifting Service in Islamabad
Shifting to a new home can be exciting, but the process of packing, loading, transporting, and unpacking can feel overwhelming. That’s where our Professional House Shifting Service in Islamabad comes in to make your move simple, safe, and stress-free.
https://bestwaypacker.com/service/cargo/
International cargo services in Islamabad
packers and movers in islamabad are the best moving company in Pakistan, offering high-quality house moving, office shifting, and goods, moving services at affordable prices all over the Pakistan.
“Fast, secure, and affordable internaional cargo services in islamabad
& Rawalpindi. We deliver worldwide by air and sea with trusted handling, on-time shipments, and hassle-free logistics—your goods, our responsibility!”
Thanks for sharing such a beautiful article
International cargo services in Islamabad
Looking for dependable
international cargo services in Islamabad Whether you're shipping personal items or business goods, we offer the most reliable and efficient solutions for all your international shipping
Reliable house shifting services in islamabad
offering safe, fast, and affordable home relocation. Professional movers ensure smooth packing, transport, and setup.
f you need reliable and affordable International Air & Sea Cargo Services from Pakistan to Worldwide, their air and sea cargo services are a great option. Fast delivery, smooth tracking, and secure handling. Full details here.
“Reliable International Cargo Shipping Service in Karachi
. Fast, secure, and door-to-door delivery worldwide!”
“Trusted International Cargo Services in Lahore. Safe, fast, and affordable worldwide delivery.”
“Professional International Cargo Service in Islamabad. Secure packing and on-time worldwide delivery.”
“Reliable International Cargo Service in Rawalpindi. Fast and secure delivery to all countries.”
International Cargo Services in Lahore
are fast and reliable.Safe packing and smooth worldwide delivery every time.
International Cargo Service in Islamabad,Get your items safely packed and shipped worldwide with ease. Hassle-free delivery every
Home Shifting Services in Islamabad ,Safe packing, careful handling, and timely delivery make your move stress-free. Move your home with confidence! 📦✅
Best packers and movers in Islamabad offering safe packing, loading, transport, and unpacking for homes and offices. Professional team, affordable rates, delivery, and insured moves for local and long-distance relocation home packers and movers in Islamabad
International Air & Sea Cargo Services in Lahore are fast, safe and reliable. Great option for worldwide shipping.
Packers and Movers in Islamabad Great info shared. Very clear and simple!
Movers and Packers in Islamabad
Movers and Packers in Pakistan
Movers and Packers in Islamabad
global freight forwarding Services in Rawalpandi Helpful post. Straight to the point!
Packers and Movers
Packers and Movers in Pakistan
Professional packers and movers in Islamabad, offering safe packing, loading, and relocation with fast air freight and economical sea shipping. Door-to-door service, tracking, and insured moves for homes and offices.
Trusted packers and movers in Rawalpindi offering expert packing, loading, and relocation with fast air freight and economical sea shipping. Door-to-door service, handling, tracking, and insured moves for homes, offices.
Best way home shifting services in Rawalpindi offers professional packing, loading and moving, with fast air freight and economical sea shipping, secure transport, tracking, and timely door-to-door delivery nationwide and worldwide.
Good Article about International Logistics Services in lahore International Logistics Services in lahore
global freight forwarding
https://youtu.be/ENKL3d3mwhw?list=RDENKL3d3mwhw
International Air & Sea Cargo Services in Lahore Nice and helpful post. Easy to read!
global freight forwarding Services in Lahore Good content here. Short and useful!
home shifting services in Islamabad offering safe packing, loading, transport and unpacking. Professional movers for house moving relocation
global freight forwarding Services in Sialkot Short and clear. Very helpful!
global freight forwarding Services in Faisalabad Nice info. Easy to understand!
Looking for International Cargo Service in Islamabad? Zain Packers provides safe packing, freight options, and end-to-end support for overseas shipments. Request pricing.
I often wonder why I can't find good pieces of content, but I finally did.
International cargo services in Lahore
International Cargo Service in Islamabad Very clear points shared. Good post!
Professional Movers and Packers in Pakistan play a key role in hassle-free home and office shifting. With proper packing materials and trained teams, moving becomes safe, fast, and affordable. Highly recommended!
It’s common to see queries for seo agency near me in Islamabad among new business owners.
Thank you for being open to sharing information with us
Packers and Movers in Islamabad
Mahir International cargo services in Islamabad is best cargo Company in Islamabad
Thank you for being open to sharing information with us
International cargo services in Islamabad
Executive Packers & Movers (a Pakistan-based company in Islamabad offering domestic/international packing moving and cargo shipping services)
International Cargo Services in Islamabad
Buy best quality poultry equipments from Roots Poultry — trusted manufacturers and suppliers of durable poultry equipment for efficient, hygienic, and profitable poultry farming.
a href="https://mahirpackers.com/transport/packers-and-movers-in-lahore/">Packers and Movers in Lahore
Thanks you for this amazing post
Air cargo services in Islamabad
Nexo Movers is a trusted name for professional relocation and logistics solutions across Pakistan. The company offers reliablePackers and Movers Islamabad
Packers and Movers in Islamabad, providing complete household and office shifting services with safe packing, careful handling, and timely delivery. contact us : 0329-5483780
Nexo House Shifting Services in Rawalpindi offers professional, safe, and affordable home relocation solutions for families and individuals across Rawalpindi and Islamabad. Our expert team handles packing, loading, transportation, unloading, and unpacking with care to ensure a smooth and stress-free moving experience. We use high-quality packing materials and secure transport methods to protect your belongings throughout the move. Whether you're shifting a small apartment or a large house, Nexo provides reliable and timely moving services tailored to your needs.
📞 Contact Us: 0334-1100072
🌐 Website: Nexo Packers and Movers in Rawalpindi
Nexo Movers provides reliable house shifting, office relocation, packing, in Lahore, ensuring safe, affordable, and timely moving solutions across Pakistan.
contact us : 03341100072
Excellent resource for businesses and individuals seeking reliable International Cargo Services in Lahore and professional Air Cargo Services in Lahore. The detailed information on shipping solutions, freight handling, and timely delivery is very helpful. For more details or bookings, contact us at 0334 1100072.
Excellent resource for businesses and individuals seeking reliable International Cargo Services in Lahore and professional Air Cargo Services in Lahore. The detailed information on shipping solutions, freight handling, and timely delivery is very helpful. For more details or bookings, contact us at 0334 1100072.
Send your shipments worldwide with confidence through Air Cargo Services in Islamabad. Enjoy secure packing, timely delivery, and professional international cargo support. Contact Us: 0334-1100072
Send your shipments worldwide with confidence through Air Cargo Services in Islamabad. Enjoy secure packing, timely delivery, and professional international cargo support. Contact Us: 0334-1100072
Send your shipments worldwide with confidence through Air Cargo Services in Islamabad. Enjoy secure packing, timely delivery, and professional international cargo support. Contact Us: 0334-1100072
If you're searching for reliable packers and movers in Lahore, Nexo Movers is a trusted choice. They provide professional house shifting services in Lahore for homes and offices. Their experienced team ensures safe packing and timely delivery. Contact 0334 1100072 for a free quote.
Looking for reliable packers and movers in Rawalpindi? Nexo Movers offers professional house shifting services in Rawalpindi with safe packing and timely delivery. Their experienced team ensures a smooth and hassle-free moving experience. Contact us at 0334 1100072 for a free quote.
https://nexomovers.com/
https://nexomovers.com/
https://nexomovers.com/
https://nexomovers.com/
https://nexomovers.com/
https://nexomovers.com/
For stress-free relocation, trust packers and movers in Rawalpindi. Their reliable house shifting services in Rawalpindi ensure your belongings are packed and transported safely. Professional service and competitive pricing make them a great choice. Contact us at 0334 1100072.
For stress-free relocation, trust packers and movers in Rawalpindi. Their reliable house shifting services in Rawalpindi ensure your belongings are packed and transported safely. Professional service and competitive pricing make them a great choice. Contact us at 0334 1100072.
Need professional Packers and Movers Karachi? Nexo Movers and Packers is your trusted relocation partner.
Our reliable House Shifting Services Karachi make every move simple, secure, and affordable.
We specialize in home, apartment, and office shifting services.
Contact Us: 0334 1100072
Choose Packers and Movers Karachi for a smooth and stress-free moving experience.
Our trusted House Shifting Services Karachi are designed for safe and timely relocation.
From packing to unloading, we handle every step with care.
Contact Us: 0334 1100072
Looking for reliable Packers and Movers Karachi? Nexo Movers and Packers offers safe and affordable moving solutions.
Our House Shifting Services Karachi ensure secure packing, transportation, and hassle-free relocation.
We provide professional moving services for homes and offices across Karachi.
Contact Us: 0334 1100072
Finding dependable packers and movers in Lahore is important for a smooth move. Nexo Movers offers quality house shifting services in Lahore at competitive prices. Their experienced team guarantees a safe and efficient relocation. Contact us today at 0334 1100072.
vcLooking for reliable packers and movers Rawalpindi? Nexo Movers provides professional and affordable moving solutions for homes and offices. Their **house shifting services in Rawalpindi** ensure safe packing, secure transportation, and timely delivery. Contact us at **0334 1100072** for a free quote.
For safe and efficient relocation, choose house-shifting-services-Lahore. Nexo Movers delivers high-quality **house shifting services in Lahore** at competitive prices with professional support. Contact us at **0334 1100072** to schedule your move today.
Post a Comment