


An original Nosey Nest Pattern.
© Copyright 2008 Nosey Nest. All rights reserved.
Please do not make money using this pattern.
In this post a little duck made a hippo happy by telling him how wonderful he is. Every once in a while there is somebody who could use some kind words too to make him feel better. So here's a tutorial for making a lucky ducky with a tiny pouch which can hold a nice note for somebody who really needs it.
The ducky in the tutorial is named Dunley. He is in the shop with his friend Henri.
Materials needed
- Felt ( three different colors are used in this tute; yellow for the duck, orange for it's beak and wings, blue for the little pouch ).
- A little scrap of fabric or felt for the heart at the pouch.
- Little black beads for the eyes.
- Some stuffing.
- Optional : some beads for decoration.
Parts ( download PDF )
1. Side ( cut twice, yellow felt )
2. Belly ( cut once, yellow felt )
3. Beak ( cut twice, orange felt )
4. Wing ( cut twice, orange felt )
5. Pouch ( cut once, blue felt )
6. Heart ( cut once, the little scrap of fabric )
Enlarge to every size you wish.
Description
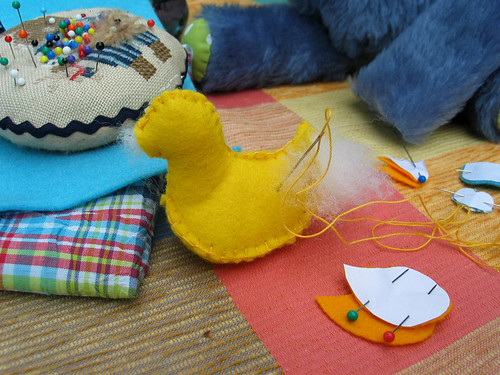
- Cut out all parts. You don't have to include a seem.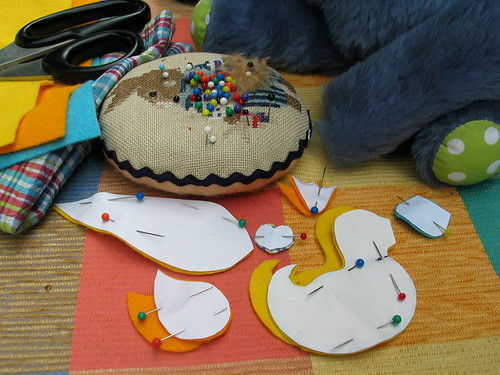
- Blanketstitch the two sides together from the top of the beak * to the tail *
- Put the tummy in. Blanketstitch from tail* to beak ** and then from chest to tail. Don't forget to stuff the body before you close it.
- Blanketstitch the two beak parts together from * to *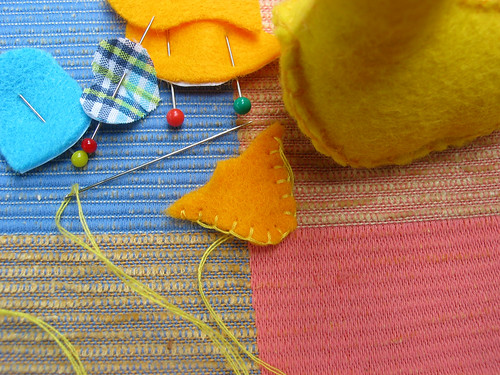
- Blanketstitch the beak at lucky ducky's head.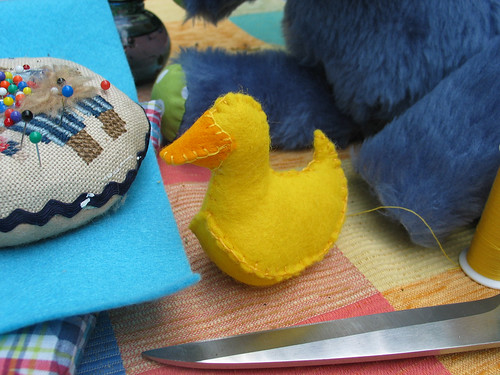
- Blanketstitch the little heart at the pouch and the pouch at the duck chest.
- Also blanketstitch the wings to the body. Leave the tips open.
- Sew on the black beads for the eyes.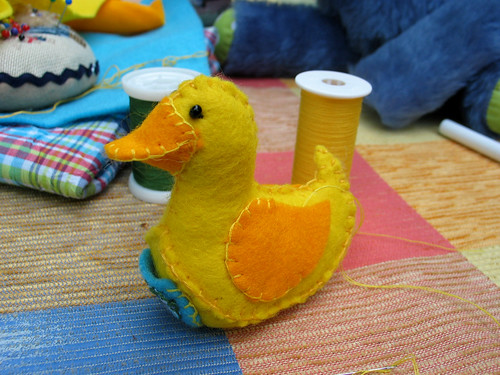
- You might want to decorate your ducky with some beads.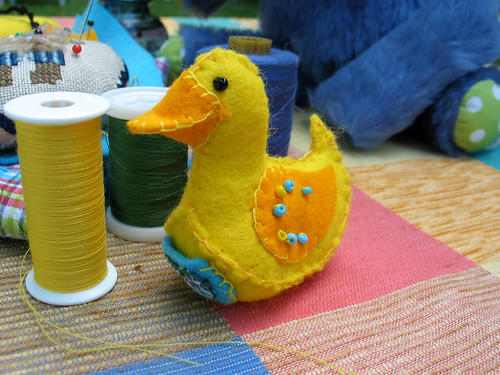
- Your done ! Put a tiny note with some kind words in lucky ducky's pouch and give him to somebody who needs .....some kind words.
If you've made a lucky ducky with this pattern please add a picture to the Nosey Nest Tutorial Group at Flickr.
Have fun !
June 12, 2008
Lucky Ducky Freebie
Subscribe to:
Post Comments (Atom)


299 comments:
1 – 200 of 299 Newer› Newest»He's adorable! Thanks so much for sharing the instructions.
You do realise I'm going to have to make one now, right? I just can't resist! I love ducks.
Thank you so much for the tutorial! Makes me guilty I haven't done more myself.
aie aie aie j'en connais une qui va se mettre à la couture !!!! MDR !!!
wow! This is great! I love all the pictures that you took along with the directions, it would help me alot while I make this! I hope to see more patterns/turtorials from you!
Thanks for share! Your blog is very nice!
Bye from Italy!
Giulia
FAntastic!!!
I'm brasilian and I'm crazy for your job...
Adorable, delicated, i'm really ompressioned
congratulacion!
Forgive-me to my porr English...kkk
My daughters and I made your cute ducks! Thanks for the great tutorial. Take a look at them at my blog www.5orangepotatoes.blogspot.com. Thanks again!
Wonderful and adorable! This will be on my list to make! Sew Mama Sew sent me.
I am just nuts about the ducky, but my email is onelukyduk so its fitting. Thanks so much, I'll be making this for my travelling applique pincushion!
Sandy
Thank you for this free pattern. I'm planning to make these for my daughter's 2nd birthday party. I posted a few pictures on the Nosey Nest Tutorials group pool. Too cute!
This is adorable. I'm going to try and make it into a pin cushion! Thought the little heart would be perfect for storing used sewing machine needles. Many thanks for your freebie!
It's wonderful! thank you for the tutorial, I'm new in the world of softies!
This duck´s beautiful and very easy to do may be the ornament of a birthday party the topic´s on a farm!
I’m hoping that we’ll end up with a slew of prototyped ideas and a bunch of happy people. I’m sure there’ll be a lot more hard work until we can turn those embryonic proofs of concept into living
wow all those garments are so amazing and fabulous I don't come to your blog as often as I would like, but whenever I do I see some really amazing things keep up the good work! =)
thank you for sharing with us,louis vuitton monogram theda gm like it very much and louis vuitton tresor wallet will always give attention.louis vuitton zipped purse
.
this is a great post thank you!
Useful information ..I am very happy to read this article..thanks for giving us this useful information. Fantastic walk-through. I appreciate this post.
Thanks for sharing this great post. and thanks for posting steps to make it.
So here's a tutorial for making a lucky ducky with a tiny pouch which can hold a nice note for somebody who really needs it.
thank you for this...it gave my daughter her first 3 d sewing project and she is using it as a toy drop for the Toy Society in August!
Thank you, I have recently been searching for information about this topic for ages and yours is the best I have discovered so far.
buy vicodin online
It is better to deal with this subject like you did instead of beating around the bush. I always like direct articles. Good job dude
Hello Dear,
Really your blog is very interesting.... it contains great and unique information. I enjoyed to visiting your blog. It's just amazing.... Thanks very much
I like your blog post. Keep on writing this type of great stuff. I'll make sure to follow up on your blog in the future.
Its amazing, looking at the time and effort you put into your blog and detailed information you provide. I’ll bookmark your blog and visit it weekly for your new posts.
Thanks a lot for sharing this amazing knowledge with us. This site is fantastic. I always find great knowledge from it.
Such a wonderful post. I got useful info from this post. keep it up and thanks for sharing. :)
Es muy interesante para mí leer este artículo. Gracias autor de la misma. Me gusta estos temas y todo lo relacionado con este asunto. Definitivamente quiero leer más pronto.
Really i appreciate the effort you made to share the knowledge.The topic here i found was really effective to the topic which i was researching for a long time
I'm still learning from you, but I try to reach my goals. Since then enjoy reading all the information that appears on your blog.Keep come. Loved it!
Really i appreciate the effort you made to share the knowledge.The topic here i found was really effective to the topic which i was researching for a long time
Thanks for the informative writing. Would mind updating some good tips about it. I still wait your next place. ;)
Very interesting thanks. I believe there's even more that could be on there! keep it up
Thanks for your info, I really enjoyed the read.
I fully agree with whatever thing you have presented.
Wau!What an adorable duck you made.I will try it too to make one;)
Thanks for your post, I like this post very much.
Yes, the post is very interesting and I really like.
Hey its been really a very good and informative post to read on
Nice information, valuable and excellent design, as share good stuff with good ideas and concepts, lots of great information and inspiration. Thanks for the great information. And thanks for sharing.
Thanks for sharing the idea.. It is very superb i am going to try this..
Herbal Pain Relief
creative
I agree with you. This post is truly inspiring. I like your post and everything you share with us is current and very informative, I want to bookmark the page so I can return here from you that you have done a fantastic job ...
I'm still learning from you, but I try to reach my goals. Since then enjoy reading all the information that appears on your blog.Keep come. Loved it!
I attack the source of the problem which will effectively correct the biomechanics decreasing the pain.
Spinal Decompression Houston
Thank you, I have recently been searching for information about this topic for ages and yours is the best I have discovered so far.
We have cure for your anxiety and pain disorders, shipped at your door step
i have the link which i was looking for my research.
This post is very well written. Thanks a lot for writing good quality posts.
One of the finest way to show your love to your near and dear ones. Not only giving this soft toys as gifts but also there's another way and thats "Message on a Necklace - A Gift of Love To Be Treasured Forever" Just check this cool site and give the best gift of the season to your loved ones.http://messageonanecklace.com/
Very interesting thanks. I believe there's even more that could be on there! keep it up
I see the article quiet critical. Thanks for sharing anyways, nice to hear
different opinions on that topic.3d ultrasounds
Hello, I am very happy to read your blog. This is another fantastic blog post what I have read.
Nicely I must say we walking on once in a while on line, being obtain instances i feel, thank you acquaintance
Interesting post. I have been wondering about this issue, so thanks for posting.
This piece was an inspiration for me to share with everyone I know. I must congratulate the author and the place and coming up with a beautiful creature like this.
maquinas de coser
maquinas de bordar
Impressive review and Important topic of discussion. I accept it is all research work, will be back to check other articles.
superb viewpoint. it would be real awesome if more blogs like this were around. many blog's talking about nothingness floating on the net. keep it
buy watson
I think you should post now. Its being a long time to read from your latest posts here Please add more valuable post for us.
I'm still learning from you, but I'm trying to achieve my goals. I certainly enjoy reading all that is posted on your blog.Keep the information coming. I loved it!
My friend recommended to this blog.... you have some awesome pictures . keep it up the great work
Good writing, I wanted to thank you for this interesting I definitely loved every little bit of it. This is really a stupendous work done by you.
ac repair Weston
"It's easy to make a buck. It's a lot tougher to make a difference."
24 hour locksmiths * locksmith washington dc
hope it is helpful! I think others may like it as well. Keep on writing.
Thank you for another fantastic posting. Where else could anyone get that kind of information in such a perfect way of writing and i was looking for more info.
Nice information, valuable and excellent design, as share good stuff with good ideas and concepts, lots of great information and inspiration. Thanks for the great information. And thanks for sharing.Hosting in India
Great information you have shared with us. This is really great post. Thanks very much for the share. keep posting......
It's quite interesting, I've ever quite understand this matter but now thanks to you I do. I can't wait to read more articles from you.
Thanks for sharing such a nice post
That is very good comment you shared.Thank you so much that for you shared those things with us.I'm wishing you to carry on with Ur achievements.All the best.
I also do agree with the stuff you shared, Thanks that's a wonderful post.
Computers Logo
This was so helpful, thank you for posting!
I'm still learning from you, but I'm trying to achieve my goals. I certainly enjoy reading all that is posted on your blog.Keep the information coming. I loved it!
Thank you for sharing this! Just what I’ve been searching for. Great info!
This is such a terrific and useful topic that you’re shared with us. Thanks for sharing.
Wow!! What a great writing, really I appreciate such kind of topics. It will be very helpful for us. Waiting for more articles, blogs like this. I’m going bookmark your blog for future reference. Thanks a lot for sharing this.
All the contents you mentioned in post is too good and can be very useful. I will keep it in mind, thanks for sharing the information. Keep updating, looking forward for more posts. Thanks.
I agree with you. This post is truly inspiring. I like your post and everything you share with us is current and very informative, I want to bookmark the page so I can return here from you that you have done a fantastic job ...
he's great! thanks for the pattern
Thank you for sharing to us.there are many person searching about that now they will find enough resources by your post.I would like to join your blog anyway so please continue sharing with us
Great post thanks
You are the most unique, gifted and exquisite visionary. I simply adore your work. I cannot stop gushing.
Writing
I'm still learning from you, but I'm trying to achieve my goals. I certainly enjoy reading all that is posted on your blog.Keep the information coming. I loved it!
This blog is good for small children's who doesn't have life tension and stress and in this blog, author also showing the tutorial about duck how to make home-made duck. I hope peoples promote this blog for children's.
Regards,
Susan Gray,
Your work is adorable, I am trying to follow and make this kind of thimble pin for my daughter, Sure thing she will love it.
Thanks!
Paxil Settlement
That's good to find useful information about your photographs on foreign sites. Great!
He's adorable! Thanks so much for sharing the instructions.
wholesale cheap jerseys
nfl jerseys cheap
cheap mlb jerseys
This is great! I love all the pictures that you took along with the directions, it would help me alot while I make this! I hope to see more patterns/turtorials from you!
I just can't resist! I love ducks.
Thank you so much for the tutorial! Makes me guilty I haven't done more myself.
cheap nike jerseys
cheap jerseys wholesale
I wanted to thank you for this great blog! I really enjoying every little bit of it and I have you bookmarked to check out new stuff you post.
They are competent enough to offer quick and efficient AC Repair Pembroke pines solutions in Florida.
Ac Repair Pembroke pines
ah ha !! it is so beautiful !! and so easy to make !!
This is happy blog post i like this.taxis in w2 | stansted to w2 | gatwick to w2
spend the same amount of money to enjoy more satisfied with the service.. w2 minicabs | minicabs in w2
taken to reduce part of the inspection items, control prescription and imports joint venture the amount of drug use. cab w2 | mirza maqbool | Maqbool mirza
Thank you for this great information, you write very well which i like very much. I am really impressed by your post.
Office furniture catalogue | Home furniture | Office furniture
Thanks for a pleasant share you have got given to America with such associate massive assortment of knowledge. nice work you have got done by sharing them to all or any. merely excellent.
Really appreciate your professional approach. These are pieces of very useful information that will be of great use for me in future.
Independent Escorts in Mumbai
This post has a useful thought and had some great idea! I might subscribe to every post you have! Android App Marketing
App Marketing Online
I am new to your blog and just spent about 1 hour and 30 minutes reading. I think I will frequently visit your blog from now on. I will definitely learn a lot from them.
very good that childer to play that
ryaonalThank you for another amazing publishing. Where else could anyone get that type of details in such an ideal way of composing and i was looking for more details.
Line Marking Melbourne | Linemarking Melbourne
ryaonalThank you for another amazing publishing. Where else could anyone get that type of details in such an ideal way of composing and i was looking for more details.
Line Marking Melbourne | Linemarking Melbourne
I would like to thank you for the efforts you have made in writing this post.
testosterone booster supplements
Thanks for the great post. You have a well written and informative Thanks for sharing it. I found this Information very interesting and informative! Keep sharing!
cheap flights to africa from london heathrow
I already saw many blogs but I like this commenting platform. Thanks a lot for your guidance and sharing information.
Lower Blood Pressure naturally
OMG...This is just what I need. Flabuless where have you been the last ten years of my life? I need you. Thanks!
Testosterone Booster with DHEA
Thanks, I was looking for information and your blog really helped me.
whole food multivitamin
Congratulation for the great post. Those who come to read your Information will find lots of helpful and informative tips.
interior decorator NJ
I enjoy a couple of from the Information which has been written, and particularly the comments posted! I will definitely be visiting again!
NJ interior designers
Thank you. I will be passing this along, I am very happy to get this post and comment here.
interior designers NJ
Good post, keep up the good work.
Airport Taxi
Hello,I love reading through your blog, I wanted to leave a little comment to support you and wish you a good continuation. Wishing you the best of luck for all your blogging efforts. travel trends
How adorable!
Search Strings
SEO Company
Google Adwords
Social Media
Web Analytics
Conversion Optimization
Reputation Management
"Hello I am Sexy Priayanshi soni l an Independent Escorts Girl available in Goa. am Female Escorts Service in Goa. FIRE UR Imagination by Hot & Sexy Girl from Goa. Read More
Hottest girl erotic, beautiful and attractive girl for sex in this escort post.Female Mumbai Independent Escorts
After reading your article I was amazed. I know that you explain it very well. And I hope that other readers will also experience how I feel after reading your article. I feel very grateful that I read this. It is very helpful and very informative and I really learned a lot from it.
Hello boys, I'm very hot young Escort girl Indu Rawat an Independent Goa Escort. I can assure you that I'm very beautiful. I would love to meet new people everyday that’s why I choose this profession. I offer outcall escort services in Goa. I am fun loving open minded girl too sexy and decent by nature. In my services yes I do oral service too. My all pictures are real, Please take a time to read about me from my blog where we can speak and arrange our special meeting. I am looking forward to confirming a precious time.
Please See my Other Friends Website:
Goa Escort
Goa Escorts
Goa Escorts Service
Independent Escorts In Goa
Goa Escorts Agency
Goa Escort Service
Escort In Goa
Goa Escorts
Goa Escort
Goa Escorts Service
Independent Escorts In Goa
Goa Escorts Service
Goa Escort Service
Escorts In Goa
Goa Escorts
Goa Escort
Goa Escorts Service
Independent Escorts In Goa
Goa Escorts Service
Goa Escort Service
Escorts In Goa
I am well spoken and highly Educated Goa Escort Girl in Goa. My Escort Services are open for business man who comes from the various cities in India and outside of India.I am 23 yrs of age. My height is 5.6 inches. I don’t work repeatedly I work as an escorts in part-time only My activities are few in a day and at the same time spend a quality amusing time with my patrons. Enjoy an memorable truly erotic quest with me than get in touch with me through mail.
See other Website of my partners:
Delhi Escorts
Delhi Escort
Delhi Escorts Service
Independent Escorts In Delhi
Delhi Escort Agency
Delhi Escort Service
Escort In Delhi
Goa Escorts
Goa Escort
Goa Escorts Service
Independent Escorts In Goa
Goa Escort Agency
Goa Escort Service
Escort In Goa
Goa Escorts
Goa Escort
Goa Escorts Service
Independent Escorts In Goa
Goa Escort Agency
Goa Escort Service
Escort In Goa
www.bobyraj.in
Mumbai Escorts
Mumbai Escorts
Mumbai Escorts Service
Escorts in Mumbai
Mumbai Escorts Agency
Independent Escorts
Mumbai Escorts
Mumbai Escorts
Mumbai Escorts Service
Escorts in Mumbai
Mumbai Escorts Agency
Independent Escorts
Independent Escorts
Mumbai Escorts
Mumbai Escorts
Mumbai Escorts Service
Escorts in Mumbai
Mumbai Escorts Agency
Independent Escorts
Mumbai in all areas in Maharashtra
One specific movement for those persons whose wants more fun and entertainment in your life. We work all time for giving wonderful escorts service in Jaipur city.
Jaipur Escorts | Independent Jaipur Escorts | Escorts in Jaipur
Normally I try such things while I am free, and I tried this too. As all of us know that being an Escorts in Hyderabad is a difficult job but Still I am enjoying doing such things. Thanks
Your post is very interesting and informative. Its very useful and helpful for me because i am a student. Thanks for sharing.static cling window stickers for cars
Hi friends, looking for escorts in India? India has vide range of Escorts Agency's
in all major cities.
Delhi Escorts
Mumbai Escorts
Noida Escorts
Raipur Escorts
Gitika Good Looking Sexy Girl Escort in Mumbai
@@@@Thanks For Sharing..............................................................@@@@@
Hi Your post is very attractive .very nice! Keep your post.images are super@Escort Goa
Call Girls in Goa/
Goa Call Girls
Goa Escorts
Escorts in GoaGoa Female Escorts/
Personal Services in Goa/
Call Girls Rates/
Call Girls in Goa providing best Goa Escort Services.and Female Model Escorts in goa.We are offering best Call Girl services & Female Escort services in goa.For more details Contact Us:09967541580
Excellent post. i need to thanks for this informative article. i actually appreciate sharing this nice post. sustain your work.
SEO Expert
Wonderful post. I am searching awesome news and idea. What I have found from your site, it is actually highly content. You have spent long time for this post. SEO Expert
If you are seeking stress-free escorting experience, you need to make sure that you examine some issues before you hire particular Mumbai Escort.
Mumbai Escort
Mumbai Escorts
Escorts in Mumbai
Independent Mumbai Escorts
The Mumbai Escorts from Travel Lady Agency are ideal, careful younger who is unbelievably attractive and sexy!
Mumbai Escorts
Escorts in Mumbai
Independent Mumbai escorts
Mumbai Escorts Agency
Mumbai escorts Services
Good Day,
Are you in any kind of financial difficulties? Your help comes now.
Are you having sleepless night worrying how to get a Loan?Don't allow
your dreams to die, or are you looking for whom to trust or having you been scammed by INTERNET fraud stars, or you have been turned down by other financial company contact
JOYCE MYERS LOAN COMPANY today for
easy and reliable loan. Please you are to fill out this form showed
below this email.{{{finance2014911@gmail.com }}}
BORROWERS APPLICANT FORM
Full Names:............
Gender:....................
Marital status:.........
Contact Address:...........
Country:........................
State:..........................
Age:...........................
Monthly Income:..............
Loan Amount:...................
Duration of Loan:............
Date Of Loan Needed:.............
Weekly Income:....................
Occupation:.........................
Purpose for Loan:.................
Phone Number:....................
Personal Phone Number:.........
Fax Number:......................
How Did You Hear About This Company?........
jaipur escorts service
Our High Class Escorts in Jaipur are exclusive and they are pretty with hourglass shaped body. Once you have a look at them, it will be hard for you to look away. They are so mesmerizing that you would eventually fall in love with them. They make sure that once you spend time with them, you will never go back to another woman. So, if you are in need of amazing Jaipur Escorts then don’t search anymore and start hiring our escorts. We ensure quality and complete satisfaction.jaipur escorts service
jaipur escorts
HIRE ME FOR FUN IN JAIPUR
Awesome post this one realy helped me at my point of confusion :) Realy thanx alot for sharing :) Keep it up ;)
Awesome post this post realy helped me at my point of confusion realy thanx for sharing thums up keep it up ;) !!!
The growth of life never in box then why you invest lot time to grab your happiness in a girl just take a look escorts in mumbai the new modern worl is not ending now .
sexykudi escort service in jaipur
sexykudi escort service in jaipur
sexykudi escort service in jaipur
Do you need a quick long or short term loan with a relatively low interest rate as low as 3%? We offer Xmas loan, business loan, personal loan, home loan, auto loan,student loan, debt consolidation loan e.t.c. no matter your score, If yes contact us via Email: finance2014911@gmail.com Fill The Loan Application Form Below Name............ Amount Needed........ Duration.......... Country............ Monthly income....... Age............. Phone Number........ Sex ................. Email................Business Plan/Use Of Your Loan:....... Apply now on this email :finance2014911@gmail.com Warm Regards Dr Purva Sharegistry
Do you need a quick long or short term loan with a relatively low interest rate as low as 3%? We offer Xmas loan, business loan, personal loan, home loan, auto loan,student loan, debt consolidation loan e.t.c. no matter your score, If yes contact us via Email: finance2014911@gmail.com Fill The Loan Application Form Below Name............ Amount Needed........ Duration.......... Country............ Monthly income....... Age............. Phone Number........ Sex ................. Email................Business Plan/Use Of Your Loan:....... Apply now on this email :finance2014911@gmail.com Warm Regards Dr Purva Sharegistry
little duck fulfilled a hippo by revealing to him how awesome he is. Now and then there is some individual who could utilize some kind words too to improve him feel. So here's an instructional exercise for making a fortunate ducky with a little pocket which can hold a pleasant note for some person who truly needs it.
So here's an instructional practice for making a lucky ducky with a little pocket which can hold a charming note for some individual who genuinely needs it.
Are you in need of a loan? Do you want to pay off your bills? Do you want to be financially stable? All you have to do is to contact us for more information on how to get started and get the loan you desire. This offer is open to all that will be able to repay back in due time. Note-that repayment time frame is negotiable and at interest rate of 3% just email us creditloan11@gmail.com
Manali Call Girls
Escort Service Manali
Manali Escorts
Call Girls in Manali
Manali Escorts Service
We belong to the elite class which occupies colorful culture of Jaipur. If you want to enjoy these exclusive escorts in a new emphatic way, you can hire us.
Most of the beautiful independent escort girls in Bangalore will be available to you for both incall and outcall services, depending on your section.
I generally mind my clients the way an individual and influenced man ought to be taken care of. I am high and superb with a lovely touch. I have long and dark hair. call girl number for service
Nice post. Thanks for sharing this information with us. Online Careprost
Really very nice post. Thanks for sharing this information with us. online careprost
Excellent Article...
buy online provigil
This is the beautiful creativity that you have done ans shared here.I am also searching for this kind of creativity with some new ideas. Thanks a lot for sharing your post helped me lot in getting some wonderful ideas of making these creative things. Looking forward for more..!!
MicroHost
Hyderabad Escorts Smooth and Smooth Independent Hyderabad escorts ladies I am 21 decades mature wonderful Contact lady in Hyderabad pressure beginner job as independent Hyderabad escorts in Hyderabad here high-class resort. http://5starhyderabadescorts.com/
Genuinely this is mind blowing post and you shared amazingly..!!
Web hosting
These Hyderabad Escorts are fun adoring and they are very attractive, they make the latest really like and nobody can offer you that type of really like in your lifestyle. http://www.sunainathakur.com/
Self Independent Escort in Hyderabad are good outstanding at making the fun and consequently they are beautiful with the roles and endeavor Hyderabad Escorts to provide fantastic operate to the men. http://www.avanimathur.com/
Welcome to the official site page of Jodhpur escorts call girl services where you can pick your preferred young ladies to satisfy the desire of yours. You are fortunate to have arrived on this page since you will discover here such an assortment, to the point that you will discover no place else. http://sanyalalbhatt.com/
Hyderabad Escorts are popular for serving their sexual services. Ensure to meet up with your wild actual desires by having fun with different individuals. It is a huge tactic to meet up with your extreme actual needs. http://www.nehanightangel.com/
The main objective of our Hyderabad Escorts services assistance agency is enjoyment and satisfaction of clients. No problem are your needs, our escort women in Hyderabad try their best to fulfill your requirements. http://www.sweetisinha.com/
For the best call girls in Bangalore visit www.wildgirllove.com . These super sexy girls looking for men in Bangalore know how to bring your dreams alive
escorts in Bangalore
bangalore escorts
escort service in bangalore
bangalore escort service
Bangalore Escorts agencies
call girl in bangalore
bangalore call girls
call girls in bangalore
bangalore call girl
Are you going through a break up, divorce or for that matter any emotional loss? If you cannot really get out of it yet, spend some time with model escorts in Kolkata.
Kolkata escorts
Kolkata escorts services
Escorts in Kolkata
Kolkata call girls
Call girls in Kolkata
Independent kolkata escorts
Visit here: http://www.kolkatavipmodels.co.in/
8420161554
Increase your assurance by relationship one of our wonderful vixens. You will feel like a master in the company of amazing and intelligent cats operates for our Jodhpur Escorts service. We have a range of stunning escorts from around the world. Our call ladies in Jodhpur are self-assures and easy-going. http://www.ankitakumari.com/
hi i am Tannu, I am hot and beautiful model in Mumbai city.i will best service provide in Mumbai in all local area city
High Profile Mumbai escorts
vile parle escorts
khar road escorts
Mira road escorts
andheri escorts
powai escorts
Mumbai Escorts Services
Mumbai Escorts
full body massage parlour in mumbai
http://mumbaiescortservices.co/mumbai-massage-parlour.html
http://mumbaiescortservices.co/about-us.html
http://mumbaiescortservices.co/services.html
http://mumbaiescortservices.co/gallery.html
http://mumbaiescortservices.co/rates.html
Visit Here: http://mumbaiescortservices.co/
Jodhpur Escorts Girls are incredibly attractive and finish in all aspects so that you have nothing to grumble about. Actually these charming Jodhpur Escort Girls are well ready for everything you are willing to do so that you can get best out of your cope. http://www.anjusenkumari.com/
All the girls who are associated with our agency to give their Hyderabad Escorts Services always execute their responsibilities and obligations by going beyond the kind of their agency. Attractive their potential customers to the complete and please them in the most realistic way is the method of their expert lifestyle. http://www.peehusinha.com/
Nice post you shared.
Advertising Agency
Plan to come in Goa at summer vacation in your business Holidays and book from here top class Russian, Indian and Foreigner escorts in Goa for your complete day dreams or night. Suhani Karnik Goa escorts charges are very affordable and genuine. So don't think any tension and dial our Goa escorts services agency Number.
Want extreme erotic fun loving moments with Hyderabad escorts services choose Sabina Khan to serve you with 100% devotion and trust. Escorts in Hyderabad as trustworthy and can be relied upon for providing erotic fun and entertainment.
Hyderabad escorts
Escorts in Hyderabad
Independent Hyderabad escorts
Hyderabad Independent escorts
Hyderabad escorts services
Hyderabad call girls
Call girls in Hyderabad.
Goa flourishes with several firms that have turned into the personality of the city. They have been the powerful constrain behind the quick development of the city. Once a lesser known town has turned into a world class cosmopolitan city today,
Goa escorts, escorts in Goa, Goa escorts services, Goa escorts agency, Independent escorts in Goa, Goa female escorts
Natalya Dsouza is one of the most in demand escorts in Goa service provider young college girl in Goa. Natalya is doing her B.Com. from the Goa university. She likes to entertain people very much as her hobby includes making new friends and chatting online. Natalya is a Goa born girl famous as youngest independent Goa escorts. She prefers serving her exotic hotness to the elite class persons of Goa.
Book Charming and stylish Amlika Kumari Russian Goa escorts girl Avail Incall escorts in Goa. Get ultimate fun and complete every moments of life. Call us our number and spend night or day with our Goa models with full satisfaction.
Elite escort services in Jaipur by Redlipps.com. Redlipss.com is the number one Jaipur escort service provider who offer various call girls, russian call girls and independent call girls. Refresh your roots for only $150 at our Jaipur City location. Call for your appointment. Our Jaipur call girls are just waiting to hear from you.
Jaipur Escort Service
Call Girl in Jaipur
Getting tired of same enough informal actions or choosing the new flavor of life something new which winged your feelings and provide your lusty sensation to be more wilder more delicate and more fantastic. If you are searching of extremely evil king I am here to get the crazy satisfaction.
Chennai escorts
escorts in Chennai
Chennai escorts services
independent escorts in Chennai
Chennai escorts agency
Chennai female escorts
Chennai model escorts
Rac Luxury Rental is Luxury Car Rental in Dubai.we Offers on sports car rental Dubai,rent luxury car Dubai, exotic car rental in Dubai. Rent lamborghini,farrari,audi,bentley,BMW,Mclaren,Mercedes,Porche,Range rover,Bugatti,Rolls Royce,etc call:- +971 56 845 2520
Luxury Cars Rental Dubai
Luxury Car Rental Dubai
Visit Here: http://www.racluxuryrental.com/
+971 56 845 2520
Lavanya Menon is one of the most in demand escorts in Goa service provider young college girl in Goa. Lavanya is doing her B.Com. from the Goa university. She likes to entertain people very much as her hobby includes making new friends and chatting online. Lavanya is a Goa born girl famous as youngest independent Goa escorts. She prefers serving her exotic hotness to the elite class persons of Goa.
Goa escorts escorts in Goa Goa call girls call girls in Goa independent Goa escorts
Russian Goa Escorts Services are grateful introducing our remarkable information Escorts and styles information in Indian. we hope that you are searching for to find an ideal charming girls becomes authentic right here at Goa Escorts. we are the most successful Escort agency in Goa providing expert name girl services from numerous stressful areas at affordable costs. http://mssanyadaynightservice.com/
Hello Buddies, I am Sweety welcome to all of you,I am indian Model and 23 years old, I am independent Goa Escorts girl. As If you are about known my release with greatly, then you can discuss with me individual with our rechargers. I am one in every of the major significant and well resolved in Goa Escorts with a huge hub of customers and fascinated people. http://mssweetybeachescort.com/
We’re a local roastery based in the heart of the Ottawa Valley. Since 1998, we’ve been roasting and delivering fresh coffee each and every week. We have a passion for good coffee and a deep respect for the people who grow it.
Fair trade coffee in Canada
Weekly delivery in Canada
Direct trade coffee in Canada
Single origin coffees Canada
Espresso best Canada
Visit here: https://www.equator.ca/
Elgin St.
Ottawa, ON K1P 5W1
equatornac.cna@gmail.com
613.563.7771
Our Baroda escort services have always remained a hot favorite for many men and they find this mode of entertainment as one of the most satisfying and enjoyable ones.
Baroda Escorts Services
We give you a Top quality system of escort services which contains sex, love, loving efforts and satisfaction for top quality customers. We have top lady employees that every man have wishes daily. Offering a real-time loving experience that you can never get from any other Udaipur Escorts Service agency. http://www.anamikaseth.com/
really its true every one has a word to make someone feel better so thanks for sharing such article..
Advertising Agency
It is actually easy! Simply opt for a lady and talk with Delhi. So you appreciate expenses time period in comfort with an wonderful woman.
Mumbai Escorts
Goa Escorts
Jaipur Call Girls
Goa Call Girls
Dehradun Call Girls
Haldwani Escorts
Jaipur Escorts
Vizag Escorts
You’ve made the capability to draw such attractive ladies to a place and your secrecy is safe with us. Call now and let's know the young lady you would like to grab to your one night from today in Delhi.
Bangalore Call Girls
Call Girls in Nainital
Escorts in Bangalore
Jaipur Call Girls
Dehradun Escorts
Mumbai Escorts
Nainital Escorts
I am Bhuvi Rawat Goa escorts. I am a 100% sexy vip escorts in goa. I am well educated, good looking girl easy going personality call girls in goa. I am only 22 years old with blue eyes & silky shiny hair. health is so important to me and I go to the gym regularly because I know what is the power of sexy figure.
independent Goa escorts
escorts in Goa
Goa escorts
Goa call girls
call girls in Goa
call girls in Goa
Goa call girls
Our independent escort girls and our classy call girls will give you utmost satisfaction. Best call girls in bangalore where we deal in independent call girl and women looking for men.
Visit here: http://www.wildgirllove.com/
Call Now
9900431503
Email
info@wildgirllove.com
Pune Escorts
Escorts in Pune
Independent Pune Escorts
Escorts Service in Pune
Escorts Pune
Female Escort in Pune
Pune Escort Service
Pune Escort
Whether you want call girls, college going girls, housewives, matured girls, working girls, we have all of them in our Mumbai agency.
Indian escort in dubai
Indian Escorts in Dubai +971588278565 Independent escort service in dubai
Really impressive post. I read it whole and going to share it with my social circles. I enjoyed your article and planning to rewrite it on my own blog
Goa Escort
Escorts services in Goa
Goa Escort Girls
Goa Call Girls
Goa Russian Escort
Calangute Escort Service
Goa Model Escorts
Ponda Escort Service
Panaji Escort Service
Varca Escort Service
Margao Escort Service
Hiii I am Bhuvi Rawat an High Profile Escorts in Goa.Our first intention is full satisfaction of our customer, so when any one reach we want to take our serves first we ask him, the type of the Independent Goa escorts in Goa you want to apply. We have many type of girl that is hot and sexy girl and they are to the full trained to give full enjoyment to our customer and contributed him to full satisfy.
Goa escorts
escorts in Goa
Goa escorts services providing by Bhuvi, the most adorable and sensual independent Goa escort and female call girls in Goa give you vital closeness.
Goa escorts
escorts in Goa
I am Natalya Dsouza the famous and very seductive Goa escorts. I am the leading escorts service provider in Goa at an affordable rate. We have a wide range of girls for you to choose the best which will suit your pocket. Our talented call girl within Goa are highly educated and follow a very hygenic routine to look always evergreen. They are always ready to take anyone to heaven with their mouthwatering figure and slim trim body for providing pleasurable nights full of adventures. http://www.natalyadsouza.co.in
Goa escorts
escorts in Goa
Escort in Bangalore are accessible for Bangalore escort service whenever clients need them. It is easy to contact Escorts and consult with then in regards to pricing. Arrangement for services of Escorts should likewise be possible online.
http://bangaloretopescorts.co.in/
Mumbai indepndent escorts
Bangalore escort service
Post a Comment